It's time to secure your npm projects
How to harden your npm projects against supply chain attacks.In the recent months we have had multiple supply chain attacks directed at the npm ecosystem, including multiple worm attacks that aim to steal credentials used in CI environments.
It's getting to the point where if I want to use your project and it isn't setup to follow these guidelines I will consider alternatives (or even forking it for myself if I need it enough) so that I can improve the chances that my projects don't get compromised.
Here's a non-exhaustive list of the bare minimum things you should be doing to protect yourself (and your users).
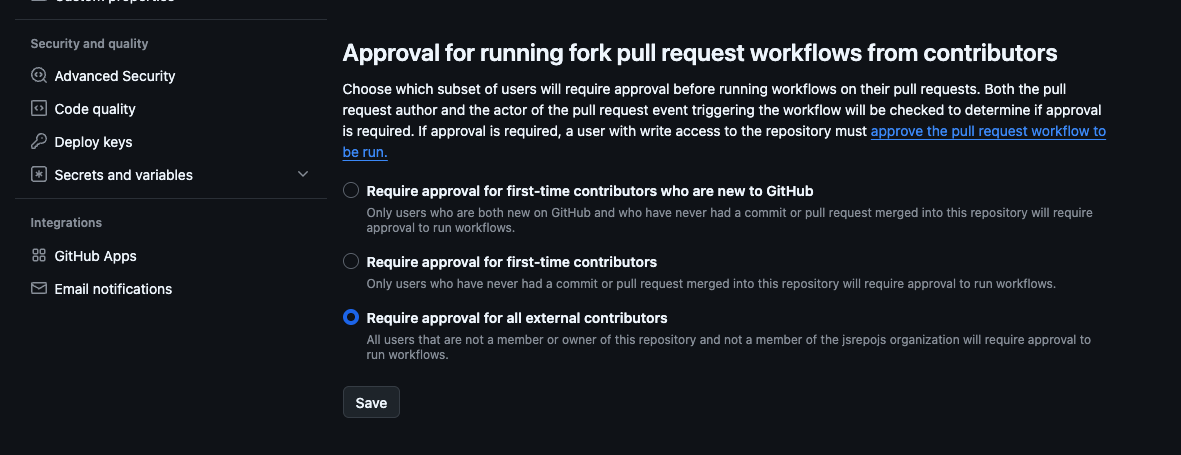
1. Turn on "Require approval for all external contributors" on GitHub
A lot of the supply chain attacks work by opening a pull request or otherwise triggering a workflow on a repository. This can be avoided by preventing any unauthorized users from triggering workflows without approval.
Navigate to https://github.com/<owner>/<repo>/settings/actions and find "Approval for running fork pull request workflows from contributors". Next, select either "Require approval for first-time contributors" OR "Require approval for all external contributors" and then hit Save.
2. Setup trusted publishing on npm
Setting up trusted publishing is incredibly easy (we won't mention the time it took me my first time but that's beside the point).
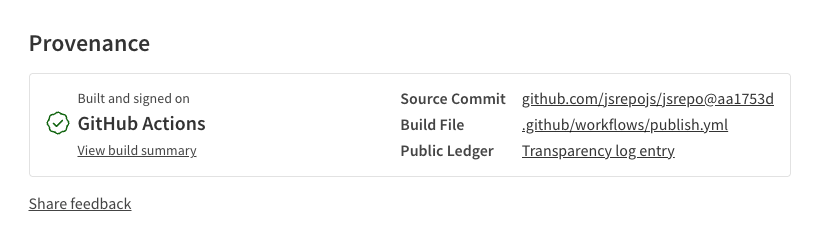
Trusted publishing will ensure that your package is published from the repository that you select and generate an entry in a transparency log using sigstore so that others can audit where your code is coming from.
Here's how you can setup trusted publishing for your projects on npm.
1. Configure your project on npm
For this first step your package will already need to be published on npm.
Navigate to your package and then to the "Settings" tab.
Here at the top you should see "Trusted Publisher":
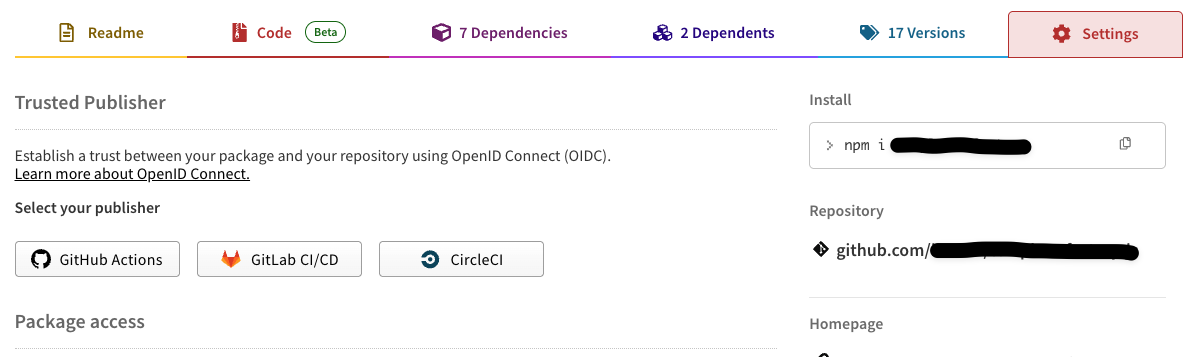
Select "GitHub" from the options.
Enter your repository information and use publish.yml as the "Workflow filename". If you are publishing from an environment then make sure you also provide the "Environment name" otherwise you can leave it blank.
Once you're done click "Set up connection" to complete the setup.
2. Configure your publish workflows
Once you've setup the trusted publisher all that's left is to setup the workflows.
My preferred way to do this (and the default for most of the ecosystem) is to use github.com/changesets. Changesets allows you to automatically version and release your packages while also maintaining a CHANGELOG.md for each one of your published packages.
The basic workflow for changesets is as follows:
- Create a changeset using the changesets CLI with either a patch, minor, or major change.
- Commit that changeset to the main branch
- Changesets will look at these changesets and create a PR automatically to version your package accordingly
- Once the versioning PR is merged Changesets will automatically publish your package to npm
I love changesets because it makes it easier to track what changed, when, and why by simply looking through the commits in the changelog. I sorely miss it on every project that's not making use of it.
Here's how to set it up:
1. Setup changesets
pnpm install @changesets/cli -DNext run:
pnpm changeset initThis will setup a .changeset folder with everything you need to start creating changesets.
If you open up .changeset/config.json there are a few things you may want to change here.
- Set "access" to "public" - this will ensure your packages are published to npm as public
- Optionally configure better changelogs. - I like @svitejs/changesets-changelog-github-compact for this as it creates cleaner changelogs and links to PRs instead of commits
2. Setup the ci:release script in your package.json
If you are publishing a package that needs to be built like most of us are now then it's useful to have a pre-publish script; this will serve that purpose for us.
Create a ci:release script in your package.json like so:
{
	// ...
	"private": false, // also important that private is set to false when publishing packages
	// ...
	"scripts": {
		// ...
		"ci:release": "npm run build:packages && changeset publish" // make sure you run `changeset publish` before you're done
	}
	// ...
}3. Setup publish.yml
Now that you've configured changesets we can finally setup your publish workflow.
Here's a (heavily commented) workflow you can use:
name: Publish

on:
  push:
    branches:
      - main # if you are using master or another branch as your default branch make sure to change this

jobs:
  release:
    permissions:
      contents: write # to create release (changesets/action)
      pull-requests: write # to create pull request (changesets/action)
      id-token: write # Required for OIDC
    name: Build & Publish Release
    runs-on: ubuntu-latest

    steps:
      - uses: actions/checkout@v4
        with:
          # This makes Actions fetch all Git history so that Changesets can generate changelogs with the correct commits
          fetch-depth: 0
      - uses: pnpm/action-setup@v4
      - uses: actions/setup-node@v4
        with:
          node-version: '24' # put whatever node version you are using here

      # we need to install the latest version of the npm CLI to ensure that it has the ability to generate provenance
      - run: npm install -g npm@latest

      # if you're using another package manager make sure you have it here
      - name: Install dependencies
        run: pnpm install

      - name: Create Release Pull Request or Publish to npm
        id: changesets
        uses: changesets/action@v1
        with:
          # feel free to change the name of the PR title and commit here
          commit: 'chore(release): version package'
          title: 'chore(release): version package'
          publish: pnpm ci:release # here's that script we created earlier
        env:
          GITHUB_TOKEN: ${{ secrets.GITHUB_TOKEN }} # changesets needs this to be able to open PRs
NPM_CONFIG_PROVENANCE: true # make sure this is true you need this for trusted publishing3. Configure GitHub settings for changesets
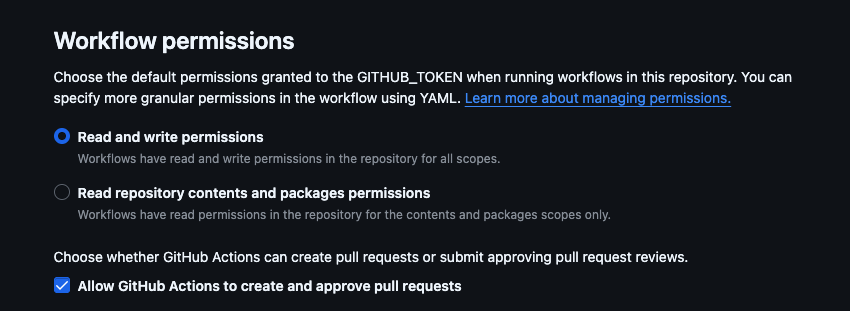
You will need to configure the following settings under https://github.com/<owner>/<repo>/settings/actions to make sure they are ready for publishing with changesets:
- Workflow Permissions - Set this to "Read and write permissions"
- Choose whether GitHub Actions can create pull requests or submit approving pull request reviews - Check this box
You may also consider configuring the changeset-bot to run on your PRs and let you know how your changesets will effect versioning of your packages.
4. Create a changeset and commit it to your main branch
Now you can create a changeset to publish your first trusted version with:
pnpm changesetIf you're new to changesets I find a good convention for naming them is to follow the same kind of conventions as in conventional commits.
Once you've done that commit the changeset to your main branch and changesets will open a PR for you. Once you merge that PR changesets will automatically publish the next version of your package.
Finally
I can't guarantee that this will prevent your packages from being compromised but these are some great first steps towards better securing the ecosystem.

Frontend Engineer
 finalchat
 The last chat you'll ever need
The modern registry toolchain
 shadcn-svelte-extras
 Extra components for shadcn-svelte
A Svelte port of shadcn/ui
Want to work with me? Great! Reach out below!
Contact Me